

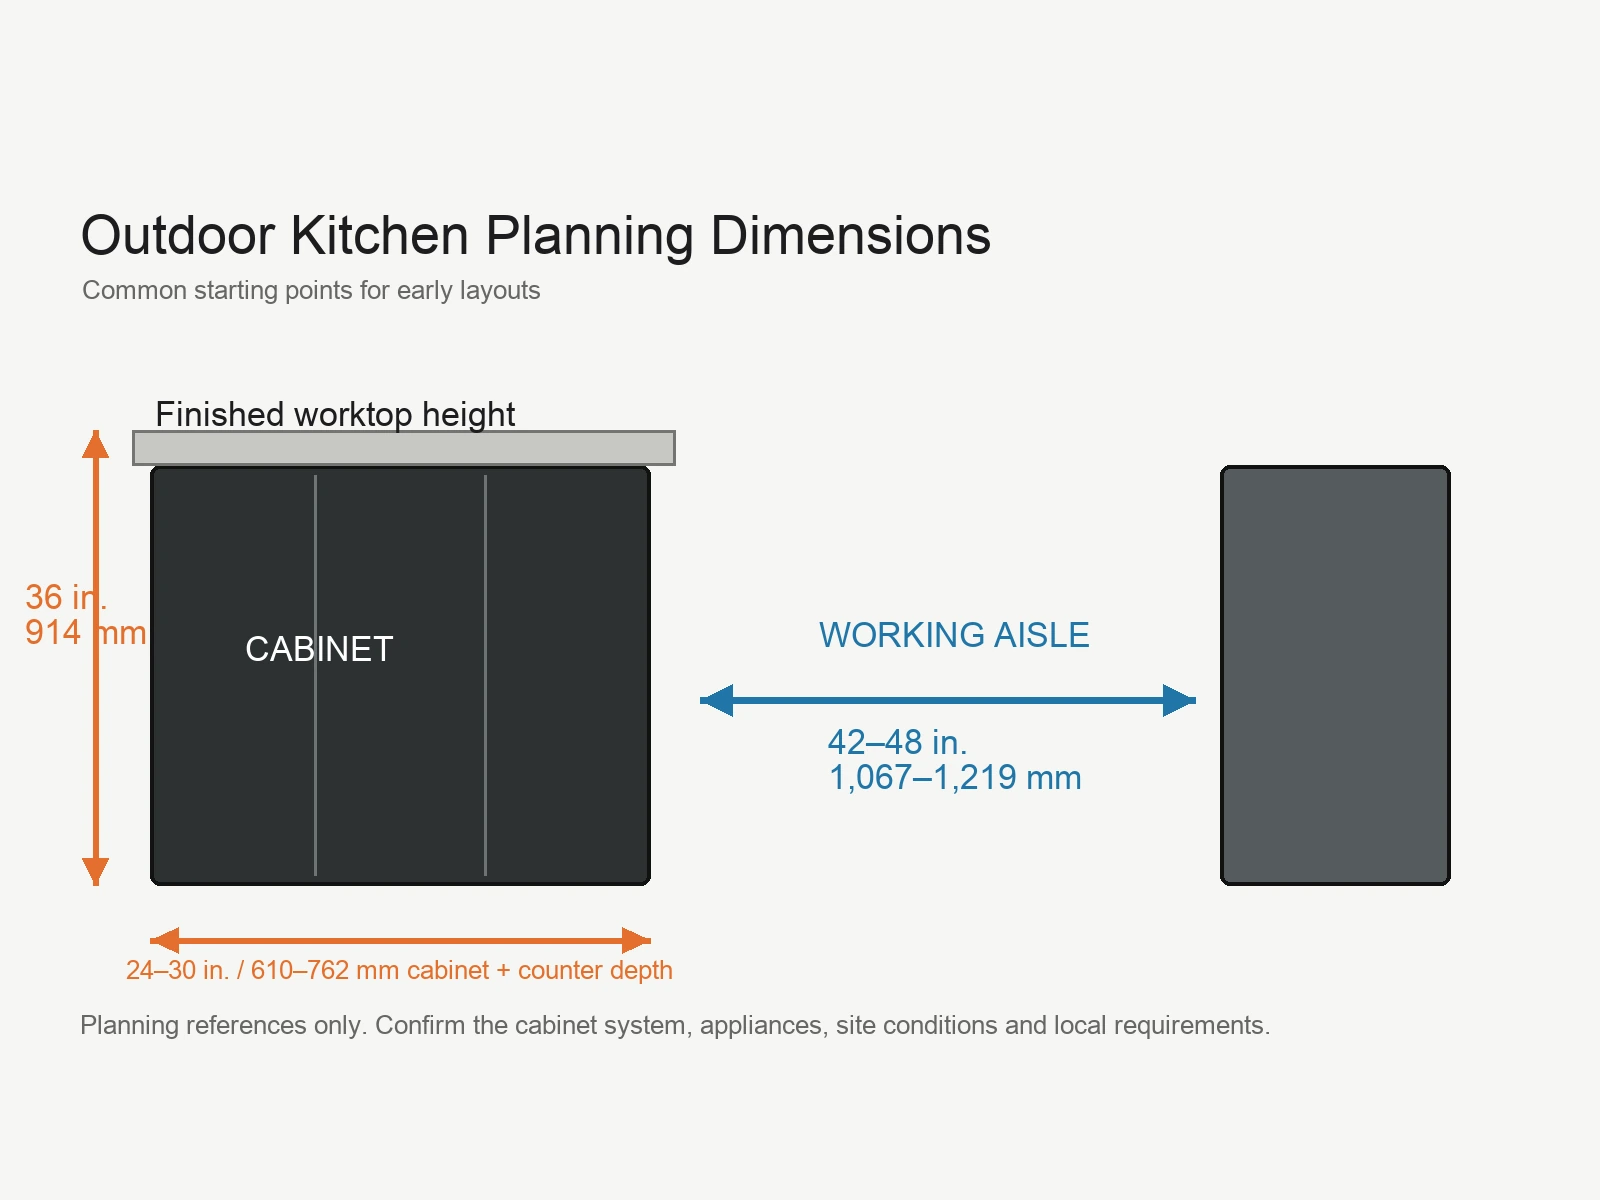
An outdoor kitchen can fit the patio on paper and still be difficult to use. The grill lid may hit a wall. A refrigerator door may block the only walkway. Two cabinet doors may collide at a corner. A bar overhang may leave too little room for people to sit and pass.
Good planning starts with the finished dimensions of the whole working area, not just the nominal width of each cabinet. Cabinet depth, counter height, appliance cutouts, door swings, working aisles and utility access all affect the final layout.
This guide explains the common outdoor kitchen dimensions used during early planning. They are useful starting points, not universal construction rules. Final dimensions must follow the selected appliances, the cabinet system, the site conditions and applicable local requirements.
Outdoor kitchen dimensions at a glance
| Planning item | Common starting point | Metric reference | What must be confirmed |
|---|---|---|---|
| Base cabinet or counter depth | About 24–30 in. | About 610–762 mm | Cabinet system, countertop and appliance depth |
| Standard worktop height | About 36 in. | About 914 mm | User needs, cabinet legs and countertop build-up |
| Raised bar height | About 42 in. | About 1,067 mm | Stool height and seating design |
| Single working aisle | About 42 in. where space allows | About 1,067 mm | Door swings, number of cooks and traffic |
| Wider two-person work aisle | About 48 in. | About 1,219 mm | Opposing appliances and simultaneous use |
| U-shaped accessible turning space | May require 60 in. | 1,524 mm | Applicable accessibility standard and project jurisdiction |
| Seating width per person | About 24 in. | About 610 mm | Stool width and armrests |
| Typical bar knee depth | About 12–15 in. | About 305–381 mm | Counter height, support and structural design |
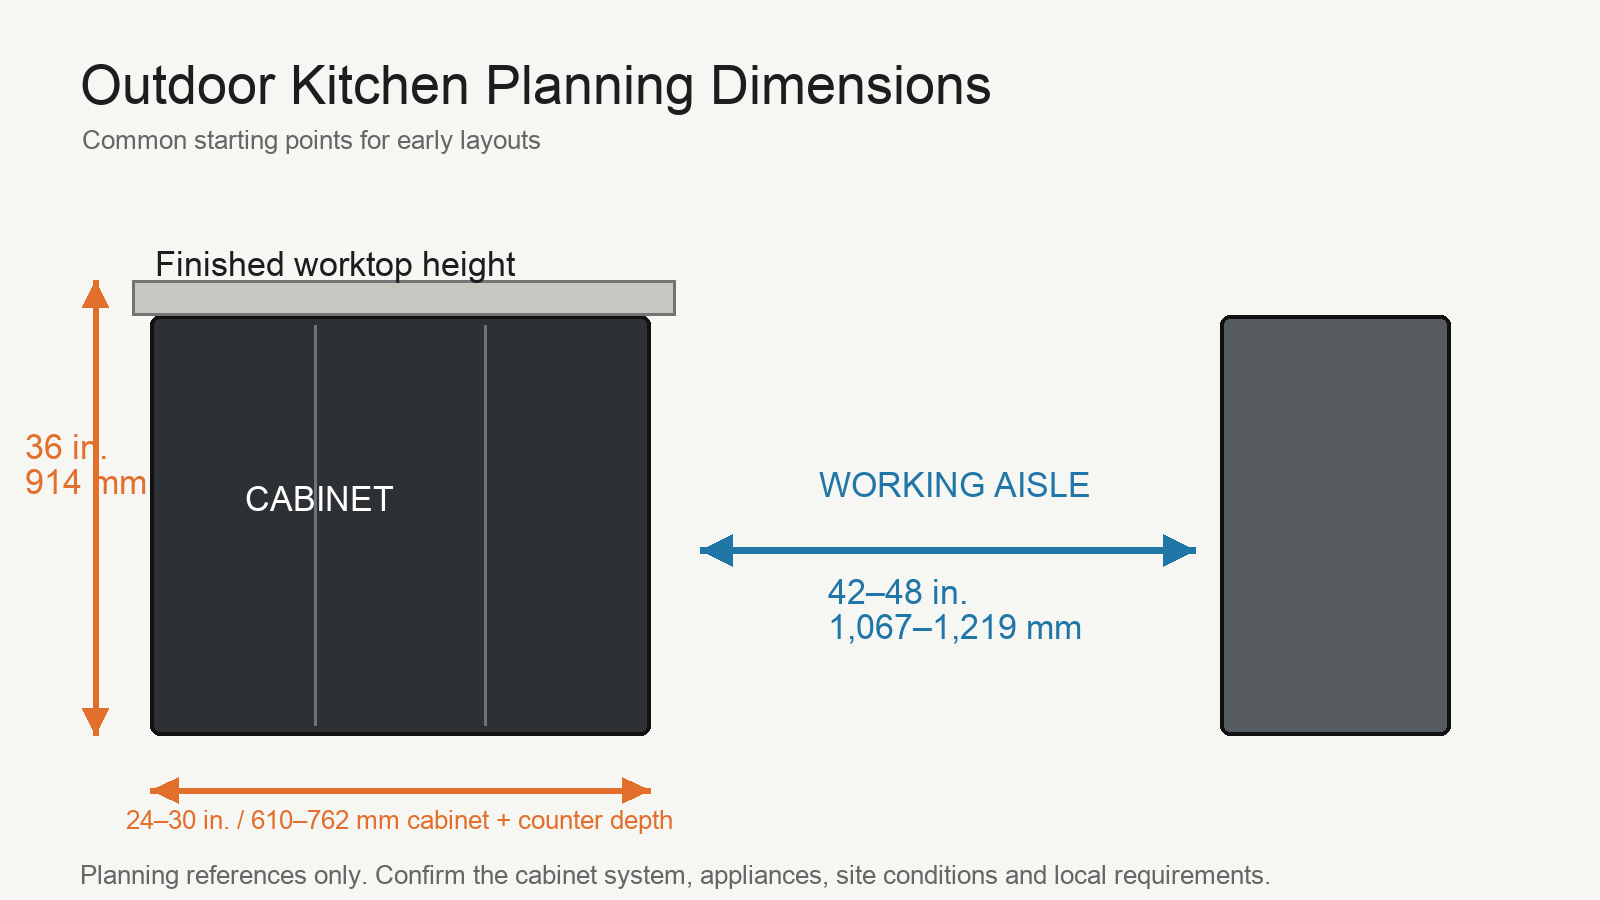
These figures are intentionally shown as planning ranges. Outdoor cabinet systems do not all use the same finished depth. Published examples range from roughly 23 inches to more than 27 inches before project-specific countertop and appliance conditions are considered. That difference is large enough to affect a narrow patio or a galley layout.
Measure the usable space, not the whole patio
Begin with a dimensioned site sketch. Measure the area that can actually receive the kitchen, then mark anything that reduces it:
- doors and their swing paths;
- windows and low sills;
- walls, parapets, fences and railings;
- columns and pergola posts;
- steps, drains and changes in floor level;
- gas, electrical, water and drainage points;
- roof edges, hoods and other overhead restrictions;
- the route used to deliver cabinet modules to the installation area.
Measure at more than one point. Existing walls are not always square, and a nominally straight patio edge can vary enough to create an installation problem. For a rooftop, balcony or resort project, also record lift dimensions, door openings and weight-related requirements before the cabinet schedule is finalized.
Keep the raw site measurements separate from any allowance added by a designer or installer. A drawing is easier to review when it clearly distinguishes verified dimensions from assumptions.
What is a typical outdoor kitchen cabinet depth?
A 24-inch (610 mm) depth is a useful early reference for many base-cabinet layouts, and it appears frequently in outdoor kitchen planning guidance. It should not be treated as a fixed industry rule.
The finished depth may include several separate layers:
- the cabinet box;
- the door or drawer front;
- rear service space;
- wall clearance;
- the countertop and its front overhang;
- appliance projections, handles or ventilation space.
Some outdoor cabinet lines publish finished depths closer to 25–28 inches, while grill or sink cabinets may be deeper than standard storage modules. If a project team reserves exactly 24 inches against a wall without checking the selected system, the finished counter may extend farther into the walkway than expected.
For a straight run, show both the cabinet depth and the maximum finished projection. For an island, show the total depth from the cook’s side to the guest side, including any seating overhang. For opposing runs, calculate the clear aisle from the most projecting finished surfaces—not from the wall or cabinet-box lines.
Counter height: 36 inches is a reference, not a promise
A worktop around 36 inches (914 mm) high is a common starting point for preparation and cooking. A raised bar is often planned around 42 inches (1,067 mm). The final height depends on the cabinet body, adjustable legs, countertop thickness, appliance flange and the people who will use the kitchen.
The drawing should state whether the height is measured to:
- the cabinet body;
- the top of the countertop substrate;
- the finished countertop surface; or
- the top of an appliance.
This distinction matters when a grill must sit flush with the surrounding worktop. A small difference in countertop build-up can leave an appliance proud of the surface or below it.
Commercial, hospitality and multi-family projects may also have accessibility requirements. The ADA Standards, for example, contain specific provisions for kitchen clearances, work surfaces, knee and toe space. Those requirements should be reviewed for the actual project and jurisdiction rather than copied from a residential rule of thumb.
How much clearance does an outdoor kitchen need?
Clearance is the usable open distance after cabinets, countertops, appliance handles and other projections are installed.
For a working aisle between an outdoor kitchen and an opposing counter or obstruction, approximately 42 inches (1,067 mm) is a practical planning target where space allows. Around 48 inches (1,219 mm) gives two people more room to work and pass. A compact layout may use less, but every door, drawer and appliance should be tested on the drawing before reducing the aisle.
Ask four questions for each aisle:
- Can the largest door or drawer open fully?
- Can someone stand at the grill while another person passes behind?
- Can the refrigerator open without closing the route out of the kitchen?
- Can equipment be removed later for service?
A wide aisle is not automatically a good aisle. If it places the sink, refrigerator and preparation surface too far apart, routine work becomes inefficient. The goal is enough room for safe movement without breaking the working sequence.
Plan door, drawer and corner clearances before production
Corners create some of the most common conflicts in multi-cabinet outdoor kitchen layouts. Two cabinet sections may fit dimensionally while their doors, handles or drawers cannot open together. Check the operating clearance of every panel before approving the layout.
On an L-shaped layout, check:
- the swing of the corner cabinet door;
- drawer-pull clearance from the adjacent handle;
- side-panel and filler requirements;
- countertop seams and overhangs;
- refrigerator ventilation and hinge side;
- grill lid clearance from a raised counter or wall.
Do the same for access panels. A utility shutoff hidden behind a cabinet is not useful if a shelf, drawer box or appliance prevents the panel from being removed.
A small filler can solve a handle collision, but it changes the total run length. It is better to include that allowance in the approved drawing than to discover it during installation.
Appliance dimensions come before cabinet openings
Terms such as “32-inch grill” or “24-inch refrigerator” usually describe a product category or nominal size. They do not provide enough information to fabricate the surrounding cabinet.
Before finalizing a grill, refrigerator, sink, side burner or ice maker cabinet, obtain:
- the exact model number;
- overall product dimensions;
- manufacturer cutout dimensions;
- flange and support details;
- ventilation requirements;
- utility entry locations;
- door, lid and handle projections;
- required service access;
- combustible-clearance instructions;
- any required insulating jacket or liner.
Built-in grills are especially important because cutouts are not standardized. Combustible-clearance requirements also vary by appliance and installation. The selected manufacturer’s installation manual takes priority over a generic spacing table.
Do not release a grill cabinet for production from a marketing name, website thumbnail or nominal cooking width. Use the approved cutout sheet for the exact appliance supplied to the project.
Leave working surface beside the grill and sink
A layout can contain every requested appliance and still fail because it has no usable landing space.
The grill needs a place for raw ingredients, utensils and hot trays. The sink needs space for preparation and cleanup. A refrigerator should open toward a nearby landing surface rather than into the cook’s path.
As an early planning reference, many outdoor kitchen guides show at least 12 inches (305 mm) of surface beside major equipment, with more uninterrupted worktop where the layout permits. The right amount depends on how the kitchen will be used. A private villa with one cook is different from a resort BBQ area preparing food for a group.
Do not count a narrow strip behind a raised bar, a corner that cannot be reached, or a surface interrupted by a side burner as full preparation space.
Seating dimensions need more than an overhang
A comfortable bar needs room for the person, the stool and circulation behind it.
A useful planning allowance is approximately 24 inches (610 mm) of counter width per seat. Depending on the counter height, knee depth often falls around 12–15 inches (305–381 mm). Stools with arms, swivel seats or wide frames may need more room.
The overhang must also be supported correctly. Stone type, thickness, span and bracket design determine whether a deep overhang is structurally acceptable. Do not specify an overhang from comfort alone.
Behind the stools, allow for people to pull out a seat and for others to pass if the bar sits on a circulation route. Measure this from the countertop edge and the expected occupied seating position, not simply from the cabinet back.
Keep guest seating away from the grill lid, hot side burners and the cook’s main route between refrigeration, preparation and cooking zones.
Dimensions by layout type
Straight outdoor kitchen
A straight run uses space efficiently and is often suitable for narrow patios. Add the widths of the selected modules, fillers, finished end panels and any required gaps. Then confirm that usable worktop remains between appliances.
Do not assume that a long wall is fully available. Windows, vents and outward-opening doors may divide it into smaller usable sections.
L-shaped outdoor kitchen
An L-shape can separate cooking from preparation or serving. The inside corner requires the most attention. Show door swings and handle projections on the plan, not just rectangular cabinet footprints.
If one leg includes seating, calculate its full depth separately from the working leg.
Island or parallel outdoor kitchen
An island needs clearance on every active side. A parallel layout needs enough room between runs for open appliances and people working at the same time. About 42–48 inches is a reasonable early aisle study, but the final value should follow the actual door and appliance conditions.
Check floor drains, utility feeds and access below the finished surface before approving a freestanding position.
U-shaped outdoor kitchen
A U-shape provides storage and worktop on three sides, but the interior can become tight quickly. Draw the clear opening after handles and appliance projections are included. Accessibility requirements may call for a 60-inch (1,524 mm) turning space in relevant configurations, subject to the applicable standard.
A practical dimension checklist for a quote request
A supplier can prepare a more accurate cabinet proposal when the first package includes:
- a dimensioned plan of the usable installation area;
- photos taken from several directions;
- wall, post, opening and level-change locations;
- the preferred straight, L-shaped, island or U-shaped layout;
- exact appliance model numbers and cutout sheets;
- known gas, power, water and drainage positions;
- finished counter height and depth targets;
- door, drawer, lid and seating clearances;
- project quantity, finish direction and destination;
- delivery restrictions and target schedule.
Mark dimensions that still need site confirmation. It is safer to carry a visible open item than to convert an estimate into a production dimension.
Cubox can review a covered outdoor kitchen cabinet configuration against the available space, appliance schedule and project requirements. Send the drawing, site photos, appliance files, quantity and destination when requesting a quotation.
Frequently asked questions
What is the standard depth of an outdoor kitchen cabinet?
About 24 inches (610 mm) is a common planning reference, but outdoor cabinet systems vary. Some finished cabinets are deeper, and grill, sink or appliance modules may require additional space. Confirm the selected cabinet and countertop system before fixing the aisle.
What is the standard outdoor kitchen counter height?
A finished worktop around 36 inches (914 mm) is common. A raised bar is often around 42 inches (1,067 mm). Countertop thickness, appliance alignment, user needs and accessibility requirements can change the final height.
How wide should the walkway behind an outdoor kitchen be?
Approximately 42 inches (1,067 mm) is a useful planning target where space allows. Around 48 inches (1,219 mm) is more comfortable for two cooks or frequent passing. Test the final width with all doors, drawers and appliances shown open.
How much room is needed for outdoor kitchen seating?
Allow roughly 24 inches (610 mm) of counter width per person as an early reference, plus suitable knee depth and enough space behind occupied stools. The stool design and circulation route may require more.
Can a grill opening be sized from the advertised grill width?
No. Use the exact manufacturer cutout sheet, installation manual and model number. Nominal grill width does not define the cabinet opening, support, ventilation or combustible-clearance requirements.
What measurements should be sent to an outdoor kitchen cabinet supplier?
Send the usable site width and depth, fixed obstacles, access route, utility positions, desired layout, finished height target and exact appliance documentation. Site photos should support a dimensioned drawing, not replace it.
Talk to Our Outdoor Kitchen Cabinet Team
Send Your Outdoor Kitchen Project Details
Use this area for cabinet layout questions, material selection, project coordination, and quote preparation.
