

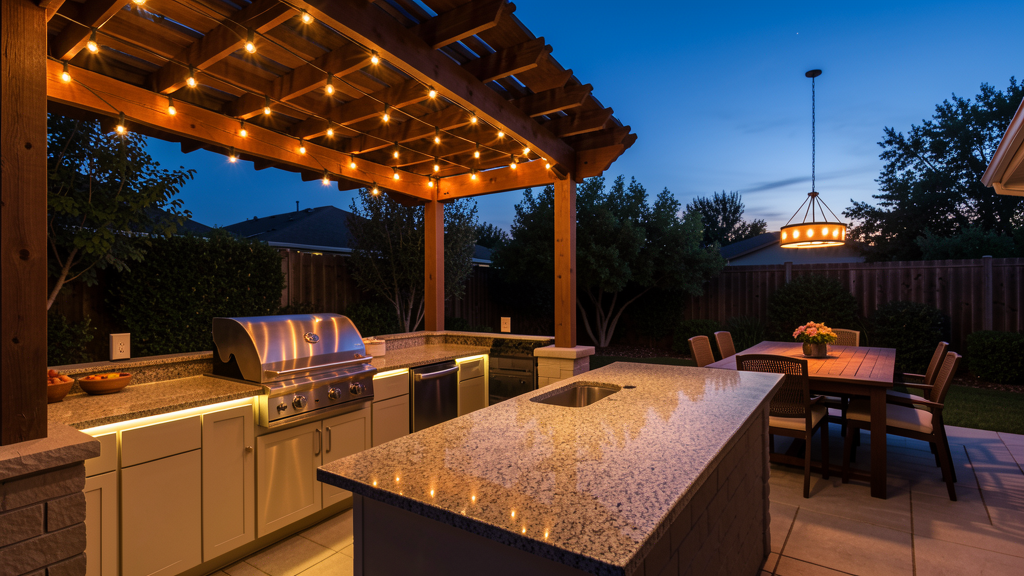
Outdoor Kitchen Lighting Guide: Create the Perfect Ambiance
Lighting transforms your outdoor kitchen from a functional cooking space into an inviting entertainment area. The right lighting extends usable hours, enhances safety, and creates atmosphere that keeps guests lingering long after the meal is done.
But outdoor kitchen lighting is more complex than indoor lighting. Fixtures must withstand weather, provide adequate task lighting for cooking, and create ambiance for dining — all while being energy-efficient and low-maintenance.
This comprehensive guide covers outdoor kitchen lighting — from task lighting for grilling to accent lighting for atmosphere — so you can design a space that works beautifully day and night.
The 3 Layers of Outdoor Kitchen Lighting
Professional lighting designers use three layers of light to create balanced, functional spaces. Your outdoor kitchen needs all three.
Layer 1: Task Lighting
Purpose: Provide bright, focused light for cooking and food preparation.
Where you need it:
– Grill and cooktop areas
– Countertops and prep surfaces
– Sink and cleaning areas
– Cutting boards and work zones
Recommended light levels:
– 50-100 foot-candles for cooking areas
– 30-50 foot-candles for prep surfaces
Best fixtures:
– Recessed LED downlights (in pergola or ceiling)
– Under-cabinet LED strips
– Pendant lights over islands
– Task lighting integrated into range hoods
Key considerations:
– Choose fixtures with high CRI (Color Rendering Index) — 80+ for accurate food color
– Use dimmable LEDs for flexibility
– Position lights to avoid shadows on work surfaces
– Ensure fixtures are rated for outdoor use (wet or damp location)
Layer 2: Ambient Lighting
Purpose: Provide general illumination for the entire space.
Where you need it:
– Overall kitchen area
– Dining and seating areas
– Walkways and circulation paths
Recommended light levels:
– 10-30 foot-candles for ambient lighting
– 5-10 foot-candles for walkways
Best fixtures:
– Pergola-integrated LED lighting
– Recessed ceiling lights
– Wall sconces
– String lights or festoon lights
– Landscape lighting (for surrounding areas)
Key considerations:
– Use warm color temperatures (2700K-3000K) for inviting atmosphere
– Dimmable fixtures allow adjustment for different occasions
– Avoid glare — use shields, louvers, or indirect lighting
– Ensure even distribution — no dark spots or harsh contrasts
Layer 3: Accent Lighting
Purpose: Highlight architectural features, create visual interest, and enhance ambiance.
Where you need it:
– Backsplashes and feature walls
– Cabinet interiors (glass-front cabinets)
– Shelving and display areas
– Plants and landscaping
– Water features or fire elements
Recommended light levels:
– 5-15 foot-candles for accent lighting
Best fixtures:
– LED strip lights (under cabinets, along toe kicks)
– Recessed adjustable spotlights
– Path lights (for surrounding landscape)
– Uplights (for trees and architectural features)
– Color-changing LEDs (for special occasions)
Key considerations:
– Use accent lighting sparingly — too much creates visual clutter
– Choose color temperatures that complement your design
– Consider smart controls for color-changing fixtures
– Ensure accent lighting doesn’t create glare or interfere with task lighting
Fixture Types: What Works Best
Different fixtures serve different purposes. Here’s what to choose for each application.
Recessed LED Downlights
Best for: Task lighting, ambient lighting
Pros:
– Clean, streamlined appearance
– Weatherproof (when rated for outdoor use)
– Energy-efficient
– Long lifespan (50,000+ hours)
– Dimmable
Cons:
– Requires ceiling or pergola structure
– Fixed direction (unless adjustable)
Where to use:
– In pergola beams or ceiling
– Over cooking and prep areas
– Over dining tables
Recommended specs:
– 800-1200 lumens (for task lighting)
– 2700K-3000K color temperature
– CRI 80+
– Wet location rated
– Dimmable
Budget: $50 – $150 per fixture (plus installation)
LED Strip Lights
Best for: Accent lighting, under-cabinet lighting
Pros:
– Flexible — can be cut to length
– Easy to install (adhesive backing)
– Energy-efficient
– Available in many color temperatures
– Can be color-changing (RGB)
Cons:
– Requires power source and controller
– Can fail if not installed properly
– May need aluminum channels for heat dissipation
Where to use:
– Under cabinets
– Along toe kicks
– Inside glass-front cabinets
– Along pergola beams
– Under countertops (for floating effect)
Recommended specs:
– 300-600 lumens per foot (for task lighting)
– 150-300 lumens per foot (for accent lighting)
– 2700K-3000K (warm white) or RGB (color-changing)
– IP65 rating (weatherproof)
– Dimmable
Budget: $20 – $80 per foot (plus controller and power supply)
Pendant Lights
Best for: Task lighting over islands, ambient lighting over dining areas
Pros:
– Decorative — adds style
– Provides focused task lighting
– Adjustable height
– Available in many styles
Cons:
– Must be rated for outdoor use
– Can be damaged by wind (if not secured)
– Requires ceiling structure
Where to use:
– Over kitchen islands
– Over dining tables
– Over bars or seating areas
Recommended specs:
– 800-1600 lumens per pendant
– 2700K-3000K color temperature
– Wet or damp location rated
– Dimmable
– Wind-resistant design
Budget: $100 – $500 per pendant (plus installation)
Wall Sconces
Best for: Ambient lighting, accent lighting
Pros:
– Decorative — enhances design
– Provides indirect lighting
– Weatherproof
– Low maintenance
Cons:
– Limited light output
– Fixed direction
Where to use:
– On walls adjacent to cooking areas
– Near entry points
– Along dining areas
– To highlight architectural features
Recommended specs:
– 400-800 lumens per sconce
– 2700K-3000K color temperature
– Wet or damp location rated
– Dimmable
Budget: $80 – $300 per sconce (plus installation)
String Lights (Festoon Lights)
Best for: Ambient lighting, creating festive atmosphere
Pros:
– Easy to install
– Creates warm, inviting atmosphere
– Flexible — can be draped or strung
– Affordable
– Available in LED (energy-efficient)
Cons:
– Limited task lighting
– Can be damaged by wind or weather (if not rated)
– May require multiple strands for large areas
Where to use:
– Over dining areas
– Across pergolas
– Along fence lines
– Around seating areas
Recommended specs:
– LED bulbs (energy-efficient)
– 2700K color temperature (warm white)
– Outdoor rated (IP44 or higher)
– Dimmable (with compatible dimmer)
Budget: $30 – $100 per strand
Landscape Lighting
Best for: Accent lighting, safety lighting for walkways
Pros:
– Enhances surrounding landscape
– Improves safety (illuminates walkways)
– Creates depth and dimension
– Low voltage (safer than line voltage)
Cons:
– Requires transformer and wiring
– May need professional installation
– Ongoing maintenance (bulb replacement, aiming)
Where to use:
– Along walkways and paths
– To highlight trees and plants
– To illuminate architectural features
– Around perimeter of outdoor kitchen
Recommended specs:
– Low voltage (12V) system
– LED fixtures (energy-efficient)
– 200-400 lumens per fixture (for path lights)
– 2700K-3000K color temperature
– Weatherproof
Budget: $50 – $200 per fixture (plus transformer and wiring)
Pergola-Integrated Lighting
If your outdoor kitchen has a pergola, it’s the perfect opportunity to integrate lighting into the structure.
Built-In LED Systems
What it is: LED strip lights or recessed fixtures integrated into pergola beams.
Benefits:
– Clean, streamlined appearance
– Protected from weather
– Provides both task and ambient lighting
– Energy-efficient
Installation:
– Requires routing channels in beams (for recessed) or surface mounting
– Must be done during pergola construction (or by professional)
– Requires waterproof connections and power supply
Recommended:
– Cubox OKM Series Pergola with integrated LED lighting
– Includes dimmable LEDs, weatherproof connections, and remote control
Budget: $500 – $1,500 (included in pergola cost)
Hanging Fixtures
What it is: Pendant lights, chandeliers, or lanterns hung from pergola beams.
Benefits:
– Decorative — adds style
– Provides focused task lighting
– Easy to install and adjust
– Can be moved or changed
Installation:
– Requires mounting hardware (hooks, chains, or cables)
– Must be rated for outdoor use
– Requires weatherproof electrical connections
Recommended:
– Outdoor-rated pendant lights
– Weatherproof lanterns
– Nautical-style fixtures (for coastal areas)
Budget: $100 – $500 per fixture (plus installation)
String Lights
What it is: Festoon lights draped across or around pergola.
Benefits:
– Creates warm, festive atmosphere
– Easy to install
– Affordable
– Flexible — can be rearranged
Installation:
– Use cup hooks or cable ties to attach to beams
– Drape in zigzag pattern or along perimeter
– Use outdoor-rated LED strands
Recommended:
– LED festoon lights with warm white bulbs
– Shatterproof bulbs (for durability)
– Dimmable strands (with compatible dimmer)
Budget: $30 – $100 per strand
Smart Lighting Controls
Smart controls allow you to adjust lighting for different occasions — from bright task lighting for cooking to dim ambient lighting for entertaining.
Dimmers
What they do: Adjust light intensity from 0-100%.
Benefits:
– Extend bulb life (dimming reduces heat)
– Save energy (lower brightness = less power)
– Create different moods
– Reduce glare
Types:
– Wall-mounted dimmers — convenient, always accessible
– Remote control dimmers — flexible, can control multiple zones
– Smart dimmers — app-controlled, programmable
Recommended:
– Lutron Caseta Wireless Smart Dimmer
– Compatible with LED fixtures
– Works with voice assistants (Alexa, Google Home)
Budget: $50 – $150 per dimmer
Smart Lighting Systems
What they do: Control multiple lighting zones from smartphone app or voice commands.
Benefits:
– Control multiple zones independently
– Create scenes (cooking, dining, entertaining)
– Schedule lighting (turn on at sunset, off at midnight)
– Integrate with other smart home devices
Types:
– Wi-Fi systems — connect directly to home network
– Zigbee/Z-Wave systems — require hub, more reliable
– Bluetooth systems — limited range, simpler setup
Recommended:
– Philips Hue Outdoor Smart Lighting
– Lutron Outdoor Smart Lighting
– Ring Smart Lighting (integrates with Ring security)
Budget: $200 – $500 for starter kit (plus additional fixtures)
Voice Control
What it does: Control lighting with voice commands.
Benefits:
– Hands-free operation (useful when cooking)
– Convenient
– Integrates with other smart home devices
Compatible devices:
– Amazon Alexa
– Google Home
– Apple HomeKit
Recommended:
– Use smart lighting systems compatible with your voice assistant
– Place voice assistant in covered area (protected from weather)
Budget: $50 – $200 for voice assistant device
Lighting Design: Putting It All Together
Here’s how to design a complete lighting system for your outdoor kitchen.
Step 1: Assess Your Space
Consider:
– Size and layout of outdoor kitchen
– Ceiling height (if covered)
– Natural light sources
– Existing electrical circuits
– Intended use (cooking, dining, entertaining)
Step 2: Identify Lighting Zones
Divide your space into zones:
– Cooking zone — grill, cooktop, prep areas
– Dining zone — table, seating area
– Circulation zone — walkways, entry points
– Accent zone — features, landscaping
Step 3: Select Fixtures for Each Zone
Cooking zone:
– Task lighting: Recessed LED downlights (800-1200 lumens each)
– Ambient lighting: Pendant lights or wall sconces
– Accent lighting: LED strip lights under cabinets
Dining zone:
– Task lighting: Pendant light over table (800-1600 lumens)
– Ambient lighting: String lights or recessed fixtures
– Accent lighting: Landscape lighting for surrounding area
Circulation zone:
– Ambient lighting: Path lights or recessed fixtures
– Safety lighting: Step lights, handrail lighting
Accent zone:
– Accent lighting: Uplights for trees, spotlights for features
Step 4: Choose Controls
Recommended:
– Dimmers for task and ambient lighting
– Smart controls for multiple zones
– Voice control for convenience
Step 5: Plan Electrical Requirements
Consider:
– Number of circuits needed
– Wire gauge (based on distance and load)
– GFCI protection (required for outdoor outlets)
– Transformer location (for low-voltage lighting)
Recommended:
– Hire licensed electrician for installation
– Use outdoor-rated fixtures and components
– Install GFCI protection on all circuits
Energy Efficiency: Save Money and Reduce Maintenance
LED lighting is the standard for outdoor kitchens — it’s energy-efficient, long-lasting, and versatile.
Why LED?
Benefits:
– 80-90% less energy than incandescent
– 25,000-50,000 hour lifespan (vs. 1,000 hours for incandescent)
– Less heat output (cooler, safer)
– Durable (solid-state construction)
– Available in many color temperatures
– Dimmable (with compatible dimmers)
Cost savings:
– LED uses 10-15 watts for same output as 60-100 watt incandescent
– Annual energy cost: $1-2 per fixture (vs. $10-15 for incandescent)
– Replacement cost: $0 for 10-15 years (vs. $5-10 annually for incandescent)
Solar Lighting
What it is: Fixtures with built-in solar panels and batteries.
Benefits:
– No wiring required
– Zero energy cost
– Easy to install
– Environmentally friendly
Cons:
– Limited light output
– Requires direct sunlight to charge
– Battery replacement every 2-3 years
– Less reliable in cloudy climates
Best for:
– Accent lighting
– Path lights
– Areas without electrical access
Budget: $30 – $150 per fixture
Low-Voltage Lighting
What it is: 12V lighting system with transformer.
Benefits:
– Safer than line voltage (120V)
– Easier to install (no conduit required)
– Energy-efficient
– Flexible (easy to add or move fixtures)
Cons:
– Requires transformer
– Voltage drop over long distances
– Limited light output per fixture
Best for:
– Landscape lighting
– Accent lighting
– Path lighting
Budget: $50 – $200 per fixture (plus transformer)
Maintenance: Keep Your Lighting Working
Outdoor lighting requires periodic maintenance to stay functional and attractive.
Monthly Tasks
- Clean fixtures — wipe down lenses and covers
- Check for damage — inspect for cracks, corrosion, or water intrusion
- Test dimmers and controls — ensure they’re working properly
- Replace burnt-out bulbs — do it promptly to maintain balanced lighting
Seasonal Tasks
- Inspect wiring — check for damage from weather or pests
- Clean solar panels — wipe down to ensure proper charging
- Adjust fixture aim — reposition landscape lights as needed
- Test GFCI outlets — press test button to ensure protection
Annual Tasks
- Deep clean fixtures — remove dirt, insect debris
- Inspect electrical connections — check for corrosion or loose connections
- Replace batteries — in solar lights, remote controls, and smart devices
- Update smart controls — install firmware updates
Common Lighting Mistakes to Avoid
Mistake 1: Insufficient Task Lighting
Problem: Can’t see what you’re cooking.
Solution: Install bright, focused task lighting over cooking and prep areas. Use 50-100 foot-candles for cooking zones.
Mistake 2: Too Much Ambient Lighting
Problem: Space feels harsh and unwelcoming.
Solution: Use dimmable fixtures and layer lighting. Keep ambient lighting at 10-30 foot-candles.
Mistake 3: Ignoring Color Temperature
Problem: Lighting feels cold and clinical (or too warm and dim).
Solution: Use 2700K-3000K for warm, inviting atmosphere. Avoid 4000K+ (too cool) or 2200K (too warm).
Mistake 4: No Dimmers
Problem: Lighting is either too bright or too dim — no flexibility.
Solution: Install dimmers on all task and ambient lighting. Use smart controls for multiple zones.
Mistake 5: Using Indoor Fixtures Outdoors
Problem: Fixtures fail quickly due to weather exposure.
Solution: Always use fixtures rated for outdoor use (wet or damp location).
Mistake 6: Poor Fixture Placement
Problem: Shadows on work surfaces, glare in eyes, or dark spots.
Solution: Position task lights to illuminate work surfaces without shadows. Use shields or louvers to prevent glare. Ensure even distribution.
Frequently Asked Questions
How much does outdoor kitchen lighting cost?
Budget setup: $500 – $1,500
– Basic LED fixtures
– Simple dimmers
– DIY installation
Mid-range setup: $2,000 – $5,000
– Quality LED fixtures
– Smart controls
– Professional installation
Premium setup: $5,000 – $15,000+
– High-end fixtures
– Integrated pergola lighting
– Full smart home integration
– Professional design and installation
Can I install outdoor lighting myself?
Low-voltage lighting: Yes, if you’re comfortable with basic electrical work.
Line-voltage lighting: No, hire a licensed electrician. Line-voltage work requires permits and inspections.
Smart controls: Yes, most are DIY-friendly (follow manufacturer instructions).
How many lumens do I need for my outdoor kitchen?
Task lighting: 50-100 foot-candles (800-1600 lumens per fixture)
Ambient lighting: 10-30 foot-candles (400-800 lumens per fixture)
Accent lighting: 5-15 foot-candles (200-400 lumens per fixture)
Calculation: Foot-candles × square feet = total lumens needed
What color temperature should I use?
Cooking areas: 3000K-3500K (neutral white, good color rendering)
Dining areas: 2700K-3000K (warm white, inviting)
Accent lighting: 2700K-3000K (warm white) or RGB (color-changing)
Avoid: 4000K+ (too cool, clinical) or 2200K (too warm, dim)
How do I control outdoor lighting?
Options:
– Wall-mounted dimmers
– Remote control dimmers
– Smart lighting systems (app-controlled)
– Voice control (Alexa, Google Home)
– Timers (automatic on/off)
Recommended: Smart lighting system with voice control for maximum flexibility.
Do I need GFCI protection for outdoor lighting?
Yes. All outdoor electrical outlets and fixtures must have GFCI protection to prevent electrical shock. This is required by electrical code.
Conclusion: Lighting Makes the Space
Great lighting transforms your outdoor kitchen from a functional cooking area into an inviting entertainment space. By layering task, ambient, and accent lighting — and using smart controls — you can create a space that works beautifully for any occasion.
Key takeaways:
1. Use three layers of lighting: task, ambient, and accent
2. Choose LED fixtures for energy efficiency and longevity
3. Install dimmers for flexibility
4. Use smart controls for convenience
5. Always use outdoor-rated fixtures
Ready to light up your outdoor kitchen? Explore the Cubox OKM Series Pergola with integrated LED lighting for a complete, professional solution.
Request a free consultation to discuss lighting design with our team.